How to Create a User in Oracle Apps R12 EBS
Hey there, Oracle EBS explorers! 🎉 Ready to dive into the world of user management? Whether you're an aspiring admin or a seasoned pro looking for a quick refresher, you've come to the right place. Creating a new user in Oracle Apps R12 EBS might sound daunting, but I promise it’s easier than it seems. Let’s break down the process step by step, and before you know it, you’ll have your new user up and running in no time. Let’s get started!
Before we dive in, make sure you’ve got access to Oracle EBS. If you’re unsure about how to log in or need a refresher, check out How to open or access Oracle Apps R12 EBS for a step-by-step guide.
Step 1: Open and Login to Oracle EBS
First things first, launch Oracle EBS and log in using your user credentials. If you don’t have a login or need help accessing the application, refer to the linked guide above.
Step 2: Switch to the System Administrator Responsibility
Once logged in, navigate to the "System Administrator" responsibility. This responsibility grants you access to various system management tasks, including user management.
Step 3: Open the User Form
Now, it’s time to define your new user. To do this:
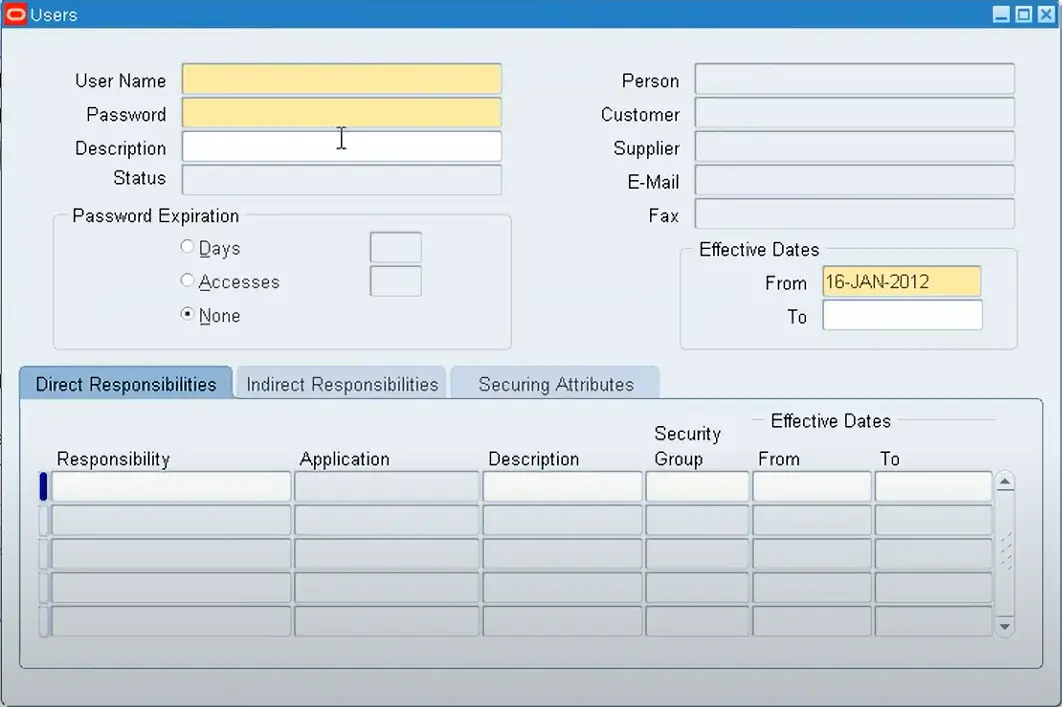
- Go to Security -> User -> Define.
This will open the "User Form," where you’ll be entering the details for the new user.

Step 4: Enter the New User Name and Password
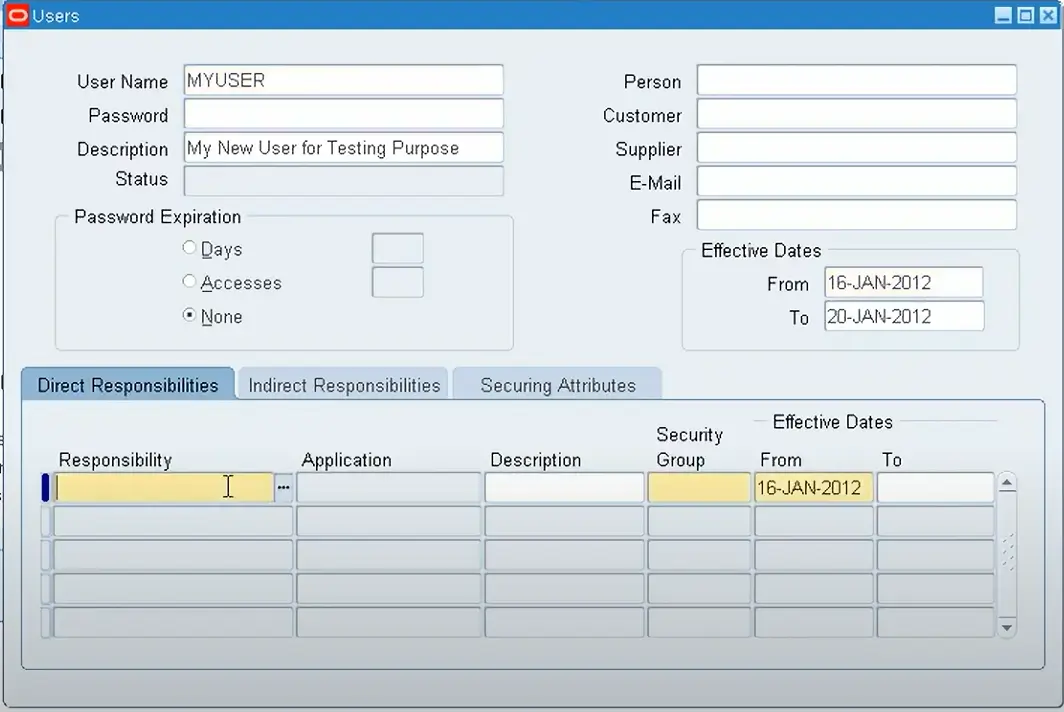
In the User Form, fill in the necessary details:
- User Name: This will be the unique identifier for the new user.
- Password: Choose a simple password for now, as it will need to be changed after the first login.
- Confirm Password: Re-enter the password for confirmation.
It’s best to keep the initial password simple, just to ensure the process goes smoothly. The user will be required to set a stronger password upon their first login.
Step 5: Assign Responsibilities
Next, you’ll need to specify what this user can access within Oracle EBS by assigning them responsibilities:
- Click on the Responsibilities field, then add the responsibilities that suit this user’s role.
- Each responsibility grants specific access to different modules, so choose based on what tasks the user will need to perform.

For example, if the user needs access to financial modules, you might assign them the "General Ledger Super User" responsibility.
Step 6: Save the New User
After entering the necessary information and assigning responsibilities, click on the Save button (usually represented by a floppy disk icon or via the File -> Save option).
Step 7: Log Out and Test the New User
Now, log out from your current user account and try logging in with the newly created user credentials.
Step 8: Change the Password
When logging in for the first time, the system will prompt you to change the password.
- Make sure to set a strong password that you’ll remember (consider using a mix of upper and lower case letters, numbers, and special characters for added security).
That’s It!
Congratulations! You’ve successfully created a new user in Oracle EBS R12. This user can now access the assigned modules and perform tasks based on the responsibilities you've given.
Creating users and managing roles are essential skills in Oracle EBS administration. Whether you’re setting up new employees or adjusting permissions for existing users, following these steps will help you get the job done efficiently.
Feel free to explore more about Oracle EBS and keep improving your skills. If you have any questions, don't hesitate to ask in the comments. Happy learning! 😊
